LoF 13: Nations at War: Come As You Are
The latest issue of Line of Fire 13 has a bunch of pretty cool scenarios. I decided to try out Matt Lohse's scenario "Come As You Are", which features an attempt by the US 82nd Airborne to capture the bridge at Nijmegen during Operation Market Garden. The Germans hastily assemble a reaction force of whomever is around and try to stop them. The scenario lasts 12 turns and each side checks for reinforcements to arrive at the start of each turn.
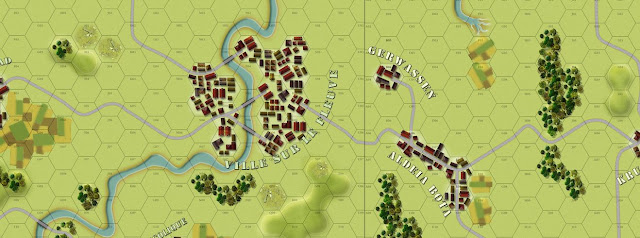
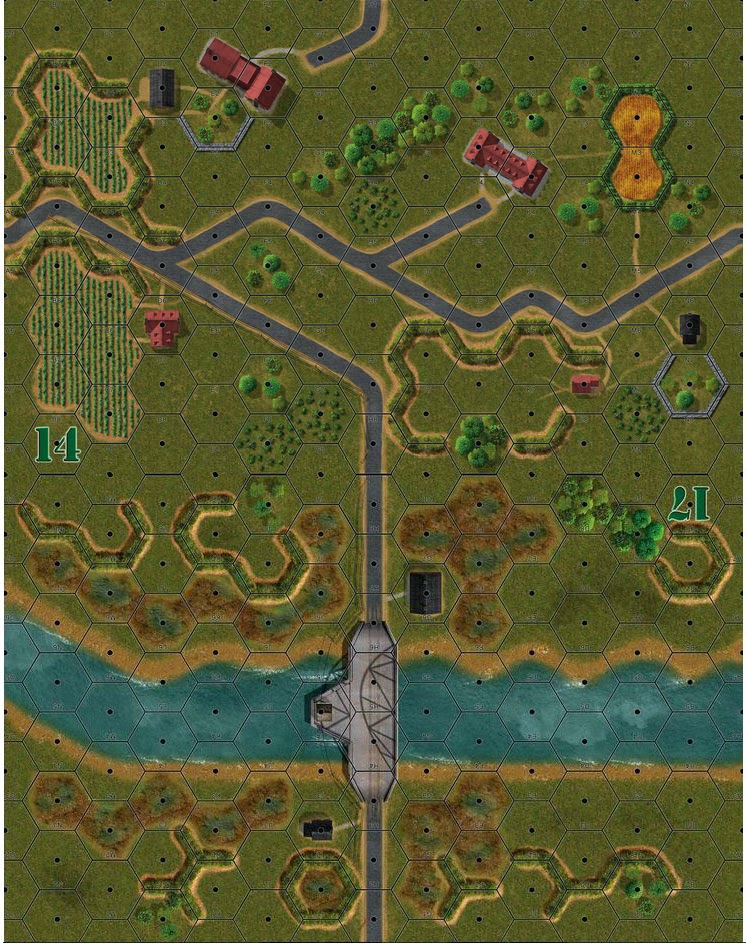
Here's our play area on boards B and C. The Americans enter from the east and the Germans are in the west.
The US sets up with a couple of meager infantry platoons and a bazooka along with an officer and advance towards the city. They're trying to capture the bridge in the middle of the city. The other bridges don't exist.

The Germans have the option of basically setting up in a concealed area after the US has moved, which they do. Not a very exciting first turn.

The US infantry advanced towards the city. The Germans open up on them and score a disruption but the US quickly recovers.

The US enters the city and destroys the lone German platoon with an infantry assault. This leaves the Germans desperate for reinforcements to prevent the US from capturing the other side of the bridge. They are forced to use fate points to get reinforcements on the next turn. The Germans get a Puma recon vehicle and two armored infantry, which roar into the area mounted in German half-tracks.

At the beginning of turn 5, the Germans get a chit pull activation and start pushing towards the city. Unfortunately, the German infantry with the HQ are all still mounted due to their need for speed. The US now has some reinforcements too, in the form of the HQ for the 82nd Airborne (note that it should be reduced as per scenario setup rules but I caught this before it affected play later on).

The US gets a chit pull at the end of turn 5 and the US officer and his two infantry platoons cross the bridge and capture the other side. The Germans have their work cut out for them now!

In the subsequent turn, chit pulls end up with End Turn markers. In Turn 7, however, the US activates and pulls the HQ into the city on the other side of the bridge. The US officer on the German side of the bridge along with his platoons, try to score hits on the German HQ sitting outside the city but they roll miserably and only score a single disruption.

The Germans decide to dismount their infantry and move it into the city to the south of the US platoons. The Puma fires ineffectively on the US units.

On Turn 8, everything goes crazy. The US activates and fires away at the Germans across the bridge, disrupting and reducing the German HMG unit. The US HQ sends one of its platoons across the bridge and to the northwest hex to hassle the Germans. US reinforcements including an HMG unit start moving on from the east but they are still pretty far away.

The Germans go all out. The Puma disrupts one of the US units nearby and the German HQ follows up with a successful assault, eliminating the bazooka platoon with the officer. The remaining para unit retreats north.

The German HQ and infantry have taken back the other side of the bridge! This will prevent a US victory.

On Turn 9, the Germans get some reinforcements. A PzIV (reduced) and a mounted infantry unit enter the map from the west.

The Germans follow up their successful assault with another one on the US infantry platoon that retreated last turn. They destroy both US infantry but this leaves the Germans with the HQ unit disrupted and the other side of the bridge open for capture.

The US HQ takes advantage of this and moves across the bridge with its platoon w/ attached HMG. Can they hold out? German reinforcements are approaching. The US has an ATG towed by a jeep on the eastern outskirts of the city while other para units are slowly but surely on their way.

On Turn 10, the Germans pull the first chit and their HQ with disrupted units retreat to keep away from the US HQ. The German Puma fires on the US HQ and platoon but with no effect. The PzIV sits at the edge of the city pouring fire at the American troops but does not score a hit.

The US activates and pulls their towed jeep with ATG across the bridge (shown crossing to make this clear). The US platoon with the HQ disrupts and reduces the adjacent German Puma.

By the end of turn 10, the US reinforcements have edged closer to the city. However, German reinforcements are pouring in too.

Turn 11 and the Germans are still unable to undisrupt their HQ unit. A German Puma and mounted infantry are on the approach. The PzIV manages to hit the American ATG and almost eliminates it except for the US use of Fate Points to save it. The US activates and moves a couple of platoons from outside the city towards the bridge.

Last turn: Turn 12 and the Germans are desperate to dislodge the US HQ. The US gets first activation. The US pulls two platoons across the bridge and an undisrupted infantry reinforcement that joined up with the German HQ opens up, scoring a hit with opportunity fire.
Meanwhile, the US HQ finally destroys the German Puma thanks to the use of the ATG and infantry support.

The Germans get a chit pull on this last turn and decide to go for it. The HQ units recover from disruption.

The German PzIV opens fire on the HQ units but fail to score a hit. The Puma stacked with the PzIV try for an assault to see if they can soften the US up for an assault by the German HQ. Unfortunately, the Puma disrupts the US ATG but is instantly destroyed by the Americans in the counter assault.

The German HQ unit moves down through the wrecked Puma marker to the south and assault the US HQ. The odds are even here and this is for all the tea in China. Unfortunately, the German HQ units score 2 hits on the Americans, destroying the ATG and eliminating the American HQ. However, the US HQ units roll for their assault. The US infantry scores 3 hits and even the disrupted ATG unit rolls a 6 and scores a hit. Four hits on two reduced German infantry completely destroys them along with the HQ. And with that, turn 12 ended and the game was over.

Summary: As you can see from the last round, this was a very tense scenario. Without knowing for certain when or if reinforcements will arrive, both sides have to "wing it" and try their best with whatever they have at their disposal. There were several back and forth moments in this game, especially when the Germans recaptured the bridge just after the mid-way point of the game and the US had the majority of its reinforcements sitting way out. Had the Puma in its final assault managed a hit on the US infantry instead of the ATG or if the German HQ had rolled a little better (or better yet, had the fate points it needed) to score more hits on the US infantry, the Germans likely would have won the scenario.
A couple of things the Germans can be proud of: 1.) They took the time on turn 7 to calmly dismount their infantry in the city rather than hastily dismounting and assaulting the US from outside of it. The US also did a great job of just feeding units into the western part of the city to keep the Germans occupied while US reinforcements made their way to join the fray.
Here's our play area on boards B and C. The Americans enter from the east and the Germans are in the west.

The US sets up with a couple of meager infantry platoons and a bazooka along with an officer and advance towards the city. They're trying to capture the bridge in the middle of the city. The other bridges don't exist.

The Germans have the option of basically setting up in a concealed area after the US has moved, which they do. Not a very exciting first turn.


In the subsequent turn, chit pulls end up with End Turn markers. In Turn 7, however, the US activates and pulls the HQ into the city on the other side of the bridge. The US officer on the German side of the bridge along with his platoons, try to score hits on the German HQ sitting outside the city but they roll miserably and only score a single disruption.

The Germans decide to dismount their infantry and move it into the city to the south of the US platoons. The Puma fires ineffectively on the US units.

On Turn 8, everything goes crazy. The US activates and fires away at the Germans across the bridge, disrupting and reducing the German HMG unit. The US HQ sends one of its platoons across the bridge and to the northwest hex to hassle the Germans. US reinforcements including an HMG unit start moving on from the east but they are still pretty far away.

The Germans go all out. The Puma disrupts one of the US units nearby and the German HQ follows up with a successful assault, eliminating the bazooka platoon with the officer. The remaining para unit retreats north.

The German HQ and infantry have taken back the other side of the bridge! This will prevent a US victory.

On Turn 9, the Germans get some reinforcements. A PzIV (reduced) and a mounted infantry unit enter the map from the west.

The Germans follow up their successful assault with another one on the US infantry platoon that retreated last turn. They destroy both US infantry but this leaves the Germans with the HQ unit disrupted and the other side of the bridge open for capture.

The US HQ takes advantage of this and moves across the bridge with its platoon w/ attached HMG. Can they hold out? German reinforcements are approaching. The US has an ATG towed by a jeep on the eastern outskirts of the city while other para units are slowly but surely on their way.

On Turn 10, the Germans pull the first chit and their HQ with disrupted units retreat to keep away from the US HQ. The German Puma fires on the US HQ and platoon but with no effect. The PzIV sits at the edge of the city pouring fire at the American troops but does not score a hit.

The US activates and pulls their towed jeep with ATG across the bridge (shown crossing to make this clear). The US platoon with the HQ disrupts and reduces the adjacent German Puma.

By the end of turn 10, the US reinforcements have edged closer to the city. However, German reinforcements are pouring in too.

Turn 11 and the Germans are still unable to undisrupt their HQ unit. A German Puma and mounted infantry are on the approach. The PzIV manages to hit the American ATG and almost eliminates it except for the US use of Fate Points to save it. The US activates and moves a couple of platoons from outside the city towards the bridge.

Last turn: Turn 12 and the Germans are desperate to dislodge the US HQ. The US gets first activation. The US pulls two platoons across the bridge and an undisrupted infantry reinforcement that joined up with the German HQ opens up, scoring a hit with opportunity fire.
Meanwhile, the US HQ finally destroys the German Puma thanks to the use of the ATG and infantry support.

The Germans get a chit pull on this last turn and decide to go for it. The HQ units recover from disruption.

The German PzIV opens fire on the HQ units but fail to score a hit. The Puma stacked with the PzIV try for an assault to see if they can soften the US up for an assault by the German HQ. Unfortunately, the Puma disrupts the US ATG but is instantly destroyed by the Americans in the counter assault.

The German HQ unit moves down through the wrecked Puma marker to the south and assault the US HQ. The odds are even here and this is for all the tea in China. Unfortunately, the German HQ units score 2 hits on the Americans, destroying the ATG and eliminating the American HQ. However, the US HQ units roll for their assault. The US infantry scores 3 hits and even the disrupted ATG unit rolls a 6 and scores a hit. Four hits on two reduced German infantry completely destroys them along with the HQ. And with that, turn 12 ended and the game was over.

Summary: As you can see from the last round, this was a very tense scenario. Without knowing for certain when or if reinforcements will arrive, both sides have to "wing it" and try their best with whatever they have at their disposal. There were several back and forth moments in this game, especially when the Germans recaptured the bridge just after the mid-way point of the game and the US had the majority of its reinforcements sitting way out. Had the Puma in its final assault managed a hit on the US infantry instead of the ATG or if the German HQ had rolled a little better (or better yet, had the fate points it needed) to score more hits on the US infantry, the Germans likely would have won the scenario.
A couple of things the Germans can be proud of: 1.) They took the time on turn 7 to calmly dismount their infantry in the city rather than hastily dismounting and assaulting the US from outside of it. The US also did a great job of just feeding units into the western part of the city to keep the Germans occupied while US reinforcements made their way to join the fray.
Comments
Post a Comment