Gulf Strike - Scenario 1: The Russians are Coming!

It is turn 8 and this is the big enchilada now. WW3 starts this turn as both the Soviets and US are now activated. They have 100 supply points allotted to them. Nothing happens in terms of random political events.
The Soviets get a bunch of reinforcements and I'm left scratching my head as to where exactly these guys should go.
The Soviets get: 7 x Airbases, 6 x Su-24, 15 x MiG-21, and a Tu-126. They also get 6 x trucks, 6 x air defense units, and 9 x airborne regiments, all delivered by IL-76. This is way more than can be delivered by IL-76 in a single turn, even though, as the scenario special rules state, the IL-76 can fly twice per turn for the first 3 turns of Soviet activation. I'm not sure where to put all this new stuff.

The Iranians' main problem right now is re-establishing a secure supply network for its army down in Saudi Arabia. Establishing a supply depot in hex 1046 with a Soviet airbase protecting it, will probably do the trick. As a bonus, the hex can be used to launch some nice shiny Su-24s to deliver their ordnance on Saudi troops. MiG-23s can also be scrambled from here to stop missions aimed at the Iranian supply node.
The next problem will be bringing my supply depots in Saudi Arabia back up north a little bit because they'll be stretched to their maximum 20 MP distance from the new supply depot in Kuwait, leaving them vulnerable to interdiction missions. This shouldn't be too hard as the supply depot on the right flank nearest Riyadh is probably a little too close to the front anyways. Near Al Hufuh on the coast, I will likely end up with a tank division that's stretched to its maximum MP distance from the nearest supply depot, but hey, it's better than having your whole army out of supply.
Since the IL-76 can land in any clear terrain hex, I can immediately fly in an airbase, an air defense unit, and an airborne regiment into 1046. Done! Boom - that's what's it like to be a superpower, I guess.
We slap two Mig-23s and two Su-24s on the airbase. The rest of the MiGs and Su-24s get put in a Soviet border airbase near the border with Turkey just to keep them secure for the time being.
Supply points get added and we end up with:
Bahrain: 5
Qatar: 21
USA: 124
Iran: 26
USSR: 130
UAE: 40
Oman: 53
Unit Assignment Stage:
Since the Americans are involved, I need to assign those F-5s to Intercept mode throughout most of my Iranian airbases. The Soviets place Mig-23s on Intercept on their airbases while keeping ground attack units on Offense. The plan is to use the new Soviet base south of Kuwait City to launch attacks on the Saudis.
The Americans decide to send a Special Forced detachment to attack a truck unit in Saudi Arabia. It's carrying a supply depot and it would be so nice to have it taken out and cause even more logistical headaches for the Iranian army.
Initiative Determination Stage:
Since the Iranians suffered a whopping 27 hits last turn, the Initiative changes to Player B.
First Action Stage:
Both sides roll a 5 and get 2 Naval Movement Points each for this stage.
First Movement Phase:
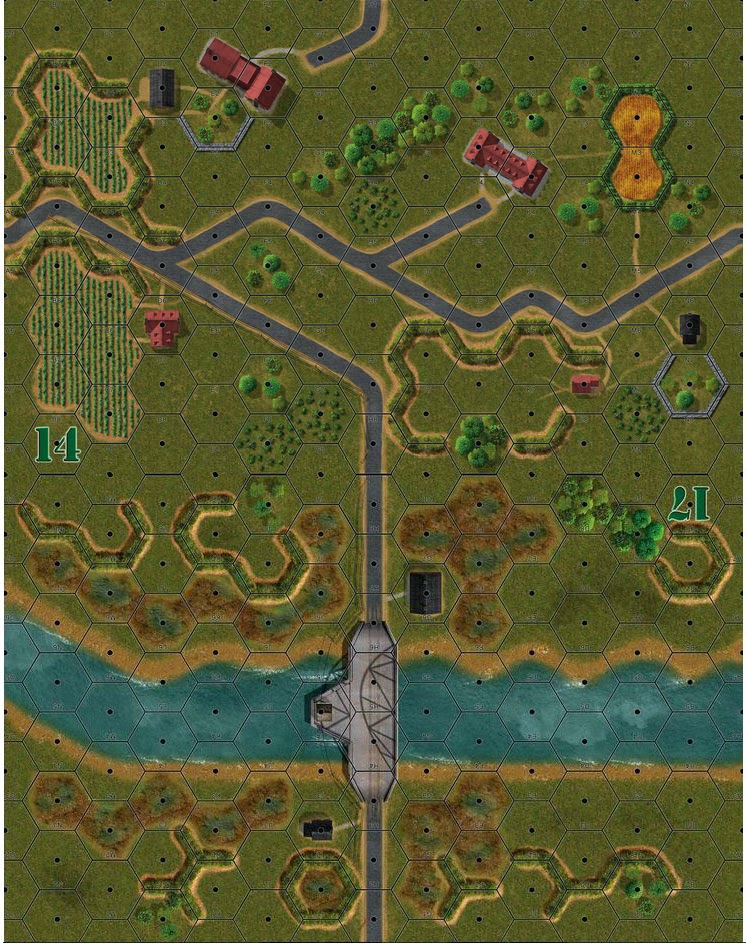
Now that I have a little breathing room, I decide to reorganize the Saudi defenses around Riyadh. I pull back all the ground units a little bit and try my best to protect the main roads into the capital. This pulls my guys into favorable defensive terrain and encourages the Iranians to move their forces forward to attack and hopefully extend their supply lines further so I can cut them off again. Then I just wait and hope that the Americans can ride to my rescue.
 |
| Battle for Riyadh: The Situation Near the Capital City |
 |
| ASW near Diego Garcia. The Soviet SS is sunk shortly after this screengrab. |
The Kitty Hawk launches a strike package to hit the Soviet CG in the same hex. Taking four hits of damage, the Soviet ship is sunk. This ship could have done some major damage to my carrier since it gets a +3 attack bonus if it manages first Soviet combat in this scenario. Lucky for the US player, he got initiative this turn and nipped the problem in the bud.
With the danger in hex Q-21 cleared away, the USS Enterprise and the Marine Amphibious ship move north to the hex to join up with the Kitty Hawk. This uses up both naval movement points. The Enterprise launches an S-3 Viking that detects the Soviet SS in N-18 but it fails to score any hits on it.
Now it's time to start whittling down the Soviet bases outside of the USSR. The B-52s are unleashed on base 805 sitting in Yemen. They are detected by a Tu-126 AWACS unit and intercepted by MiG-23s once they reach the same strategic hex. One MiG manages a single hit causing one bomber to abort. The other drops its payload and inflicts 2 damage on the Soviet airbase, which is assigned to two MiG-23s. A Special Forces detachment helps out by "lasing" the target and guiding the bombers in, gaining a +3 to the unit's bombardment strength (bringing the B-52s bombardment rating up to a mind-numbing 13). This basically ensures that I'll score 2 hits with each B-52 strike. At 2 damage, however, the base is still operational. The other base in the same strategic hex is also left untouched. Not what I was hoping for but I'll take it.
During the First Reaction Segment, the Iranians start off with sending their C-130 from Iran loaded up with a supply depot and transported to the Soviet airbase in hex 1046. I have learned my lesson from last turn and I have decent protection for the depot with an AWACS, air defense, and two Mig-23 squadrons ready to defend it). This puts the guys near Riyadh back into supply but the Iranian divisions near the coast are still out of supply. I'll need to either pull them back or let them soak up more hits. The Soviets don't do much except move a couple of subs towards the south.
There is no declared combat but there is the matter of the US Special Forces raid on the Iranian truck in hex 1354. We roll a 6 with a modified plus 3 because the target is a truck. The result is a 9 and three hits are inflicted, destroying the truck. Since this has a supply depot on board, it is also destroyed. It looks like those Iranian guys along the east coast are going to be out of supply for the rest of the turn.

Second Action Stage
The US only gets 1 NMP this stage while the USSR gets 4.
Second Initiative Movement
US player sends out a P3 Orion from Diego Garcia and it detects a Soviet SSGN in H-17, just off the coast of Somalia. It makes a successful detection attempt and attacks the sub for 3 damage. An American SSN in E-22 moves up and finishes it off.
Next we get two S-3 Viking squadrons launched from both carriers. They take on the Soviet SS in K-19 but both attempts fail.
That's all for that. Time for the Second Reaction Segment.
The Soviets launch their Su-24s from their airbase in southern Kuwait. Both attack planes hit the Saudi ground forces defending near Riyadh. The Saudi Mechanized Guards Brigade takes a hit and is flipped over to its reduced side. The 4th Mechanized Saudi Brigade is also hit and reduced. Nice work, Russkies! Two hits are allocated to Player B on the game track.
 |
| Soviet Su-24 Fencer |
I see that Player B's victory conditions involve either controlling or disputing the Straits of Hormuz. The strait can be disputed by dropping mines in strategic hex J-09 but I can't find a way to do that without being shot down by the Omani Air Force. I decide to use an NMP to activate a Soviet SSN and move it to M-10 so hopefully it will survive long enough to enter J-09 and lay some mines.
There is no ground combat this stage so we move to the:
Third Action Stage:
Naval Movement Determination;
Player A (Iran/Soviets); 4
Player B (USA/Gulf Council states): 1
Third Reaction Segment allows the reaction player (Player A at the moment) to finally move his ground units assigned to Frontline mode so things are going to get interesting.
The Iranian 1st Armored Division nearest the Saudi port of Damay is pulled back to 1553 and put back into supply.
Iranian 11th Armored Brigade w/ HQ is pulled west along the roads to 1658, which brings it into supply. A truck unit with an infantry brigade is pushed east into the same hex just to give it some kind of protection from the onslaught of airborne special forces raids. Not a good sign. As with any game, you know that when you're making decisions based on fear that things are not going well.
I get all the Iranian 8th Infantry brigades into the same hex (0456) and decide to recombine them in the next turn's Unit Assignment Stage.
The 2nd Armored Division near Al Hufuh airbase changes to Movement to Contact formation to save on supply costs and declares the Saudi airbase as its target for ground combat.
Now to get to Riyadh:
The 5th Armored Division moves down the road to hex 0560 and changes to Hasty Assault. Combat is declared against the remnants of the shattered Saudi 2nd Mechanized Brigade in 0561.
The 4th Armored Division switches from Hasty Assault to Movement to Contact formation and trundles southwest into 0459 to face down the elite Saudi Mechanized Guards brigade - a shadow of its former self with only 1 hit left before destruction.
My guess is the 2nd Brigade is about to get whalloped while the Mechanized Guard might just make it out of this one more time. At this point, it has more lives than an entire herd of cats.
With only a meager 25 supply points for the Iranians, I'll be depending on my Soviet comrades to provide some Close Air Support in the Combat Phase.

In the Initiative Segment, the US player licks his lips at the sole Soviet SS sitting on the Strategic Map and blows the hell out of it with an S-3 Viking launched from USS Kitty Hawk. The Indian Ocean is now clear of Soviet subs. Now we just need to get rid of those Soviet client-state bases and we're on our way with the Marines.
During the CAS segment, the Soviets launch the same Su-24s from last stage and assign the combat units based near Riyadh as targets to each of them. Both planes hit their target for CAS.
Ground Assault resolves as follows:
1.) Iranian 2nd Armored Division vs. truck unit at Al Hufuh airbase: 6 - 1
Attacker Combat Strength; 6
Defender Combat Strength; 1
Armor vs. Non-Armor: 2 column shift right
Supply Cost: Iran - 3 / Saudi - 1
Roll; 2
Result: 0/3
A support unit not stacked with an assault unit is forbidden to retreat so the truck takes two hits and is gone. As for the airbase, it should take a hit here. I also realize that the airbase has probably been out of supply for at least two turns so I'm going to give the Iranians a mulligan (boy do they need one) and eliminate the airbase too. The 2nd Iranian Armored Division captures Al Hufuh.
2.) Iranian 5th Armored Division vs. Saudi 2nd Armored Brigade: 3 - 1
Attacker Combat Strength: 5
Attacker Formation Hasty Attack; x 2
Attacker has CAS; +2 DRM
Attacker has Artillery: +2 DRM
Defender Combat Strength; 1
Terrain Defense Multiplier - Armor: 1.5
Supply Cost: Iran - 7 / Saudi - 1
Roll; 8
Result: 0/2
The Iranian 5th Armored Division eliminates the Saudi brigade and advances into hex 0561. Riyadh is in sight but there seems to be always one more headache to contend with. In this case, it's the Saudi 4th Mechanized Division in 0661.
3.) Iranian 4th Armored Division + Infantry Brigade vs Saudi Mech Guards: 1-2
Attacker Combat Strength: 6
Defender Combat Strength: 1
Defender Formation; Hasty Defense -> x2
Terrain Defense Multiplier - Other: 2
Troop Quality: Defender: Elite -> 3 column shifts left
Defender has Artillery: 2 column shifts left
Attacker has CAS; +2 DRM
Supply Cost: Iran - 4 / Saudi - 3
Roll; 6
Result: 1/0
The 4th Armored Division absorbs a hit and the divisional commander shakes his head as memories of trench warfare against the Iraqis start to dance in his head.

I've learned a couple of important lessons this turn. The most important is that of having a reserve force. If I had an HQ close enough to Iran 3rd Mech Division, I could have put it into reserve at the start of the turn and then let it follow up these third action stage attacks at the start of the next turn. Now because I haven't done that, the Saudis will get a chance to regroup and form another line of defense. I'm guessing the Mechanized Guard unit will pull back and present another problem for the Iranians.
The other thing I've learned is the importance of air supremacy. Having control of the air over Saudi Arabia allowed Iran to stretch their supply lines to the limit without fear of interdiction. Clearly, taking out the airbase in Riyadh last turn was a bigger deal than I actually thought. If the enemy can get even one airplane up, it presents a potentially serious hazard to supply lines and must be taken account of. This is the difference between air superiority and air supremacy.
It's incredible that such small forces can use rough terrain to their advantage to keep the Iranians off-balance and reacting to their moves. Obviously, if I had better supply systems, the Iranians could outflank them but with the terrain and the limited number of roads, it's difficult to get the logistics to work right.
During the End Stage, the Iranian 2nd Armored Division in Al Hufuh is marked out of supply and takes a hit. That's okay because this hex gives us an airfield for the Soviets to work out of next turn. The Iranians purchase a Supply Depot and place it in Tehran where I have my trusty C-130 sitting on the airfield waiting to take it somewhere. I also purchase a supply depot for the Soviets.
Comments
Post a Comment